nykh::log


  • Home

  • Archives

  • Tags

Installing Python 3.6.1 from source

Posted on 2017-03-27

This is a revisiting of a previous post setting up Ubuntu 16.04LTS. In this previous post I installed Python 3.5 from the Ubuntu/Debian repo. It was a breeze. Now that I want Python 3.6.1, however, it is not as easy. Some dependencies are not well documented and I had to find them through trial-and-error. This post documents the process.

This is a work in progress as you will see we are stuck in some last dependencies.

System spec

Ubuntu 16.04 LTS

Steps

Initial run

  1. Download source
  2. ./configure
  3. make

This will show a list of Ubuntu packages that are missing for optional packages. It is fine if you don’t really care to use those features, though. Normal system programming / data science applications are not really affected.

Ubuntu packages to install

This may not be a complete list, but here are some of them. It should be possible to sudo apt-get install all of them .

Packages Other packages
libc6
build-essential
libreadline6 -dev
libsqlite3-dev
libbz2-dev
libgdbm-dev
liblzma5 liblzma-dev/liblzma-doc
libssl-dev -doc
libncurses5 -dev/-doc
libncursesw5 -dev/-doc
tk-dev

Alternatively just copy paste the following

1
2
3
4
5
6
7
8
9
10
sudo apt-get install libc6, build-essential
sudo apt-get install libreadline6 libreadline6-dev
sudo apt-get install libsqlite3-dev
sudo apt-get install libbz2-dev
sudo apt-get install libgdbm-dev
sudo apt-get install liblzma5, liblzma-dev, liblzma-doc
sudo apt-get install libssl-dev, libssl-doc
sudo apt-get install libncurses5, libncurses5-dev, libncurses5-dbg
sudo apt-get install libncursesw5, libncursesw5-dev, libncursesw5-dbg
sudo apt-get install tk-dev

Tkinter

Note that previously there was a problem with Tkinter dependency and I was not able to find the correct dependency.
But this is officially solved by installing tk-dev package.

Version control

I recommend pyenv for managing multiple versions of python. It integrates well with virtualenv so you can not only swtich between python versions seamlessly but also create virtual environment of desired python version on the fly. Now that all Ubuntu comes with Py2.7 and Py3.5 built-in this will be handy.

The easiest way to install pyenv is by running the auto-installer

1
$ curl -L https://raw.githubusercontent.com/pyenv/pyenv-installer/master/bin/pyenv-installer | bash</div>

With all the dependencies installed. We can install with pyenv this way

1
2
export CONFIGURE_OPTS="--enable-optimizations"
pyenv install -v 3.6.1

The first line asks configure to use optimization for Python 3.6. See the discussion about the flag. According to here the flag will make the compiled binary 10% faster, which I think is worth trying out.
【Red】17行代码写出原生响应式试算表(翻译)

Posted on 2016-07-08

原文 http://www.red-lang.org/2016/07/native-reactive-spreadsheet-in-17-loc.html

我们响应式框架发布几天了,我们决定做一个常见的试算表范例,展示一下用 Red
现在的功能来写需要几行。虽然Red没有网格部件,结果我们只花17行(紧缩但仍可读的)代码
就可以做出一个试算表范例了,把代码最小化甚至可以缩小到14行1053字节。
这个范例使用原生widget,能输入同时实时更新关联单元格。

1
2
3
4
5
6
7
8
9
10
11
12
13
14
15
16
17
Red [] L: charset "ABCDEFGHI" D: union N: charset "123456789" charset "0"
repeat y 9 [repeat x 9 [col: either x = 1 [#" "][#"A" + (x - 2)]
append p: [] set ref: (to word! rejoin [col y - 1]) make face! [size: 90x24
type: pick [text field] header?: (y = 1) or (x = 1)
offset: -20x10 + as-pair ((x - 1) * size/x + 2) ((y - 1) * size/y + 1)
text: form case [y = 1 [col] x = 1 [y - 1] 'else [copy ""]]
para: make para! [align: pick [center right] header?]
extra: object [name: form ref formula: old: none]
actors: context [on-create: on-unfocus: function [f e][f/color: none
if rel: f/extra/old [react/unlink rel 'all]
if #"=" = first f/extra/formula: copy text: copy f/text [parse remove text
[any [p: L N not ["/" skip not N] insert p " " insert "/data "
| L skip | p: some D opt [dot some D] insert p " " insert " " | skip]]
f/text: rejoin [f/extra/name "/data: any [math/safe [" text {] "#UND"]}]
if f/data [any [react f/extra/old: f/data do f/data]]]]
on-focus: func [f e][f/text: any [f/extra/formula f/text] f/color: yello]
]]]] view make face! [type: 'window text: "PicoSheet" size: 840x250 pane: p]

你可以复制黏贴上面的代码到 Windows 用 Red 终端,使用最新工具链 build (950KB)。更好的选项是prebuilt版本终端 (247 KB)。
没错,我们还在用KB计算大小 ;-)

功能:

  • 100% 原生窗口构件,使用内建GUI引擎(没有第三方库。目前仅支持Windows,
    OSX与GTK制作中)
  • 支持任意Excel式公式 (=A1+2*C3)
  • 支持公式中夹杂任意Red代码
  • 输入同时实时更新
  • 编辑公式时,相关单元格会显示#UND(”undefined”)
  • 如果公式语法出错,单元格显示#UND
  • 代码紧缩以减少行数,但每行不超过82个字符(去掉缩进只要77个)
  • 建构试算表花了6行代码,把公式编译成Red表达式花了3行代码。
  • 每行一个表达式(或是嵌套表达式)。不算Red的头部,不算最后一行把选中单元格
    背景设为黄色,那行只是为了让动画截屏容易看懂。
  • 不使用GUI用的 VID 方言,这部份留给读者作为练习 ;-)

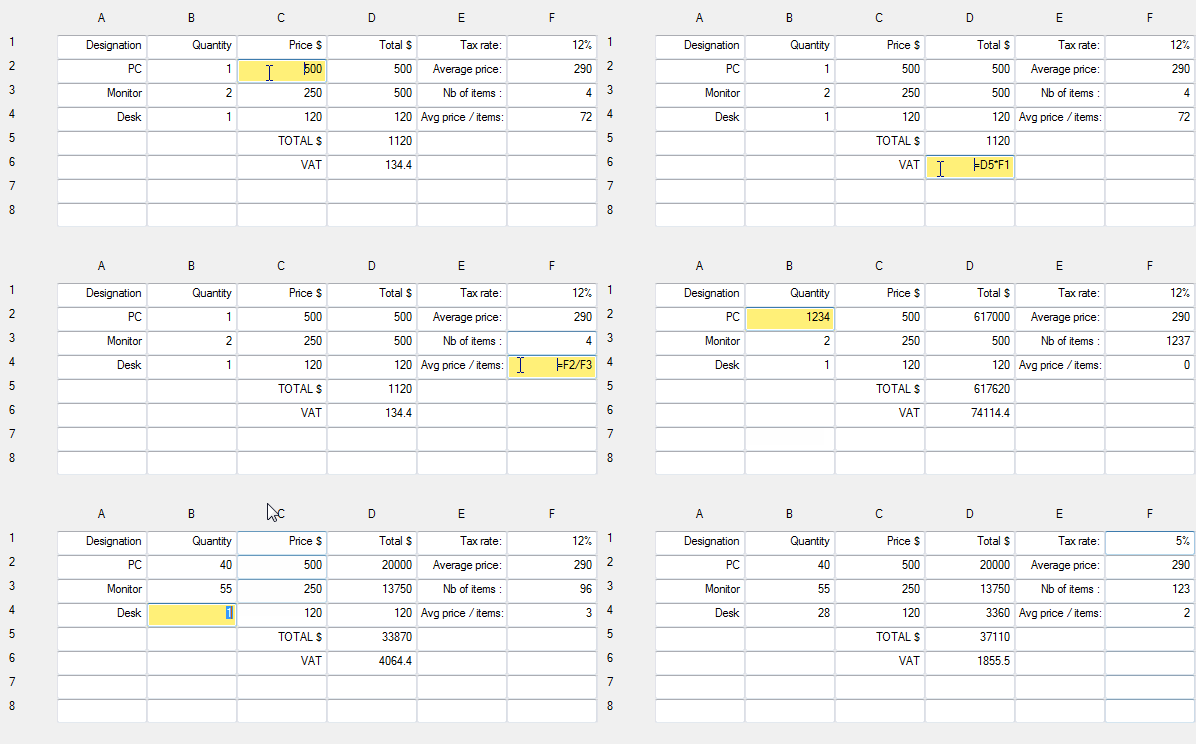
以下是范例的截图

盗链XD

如果你想用这个资料集试试看,使用这个脚本

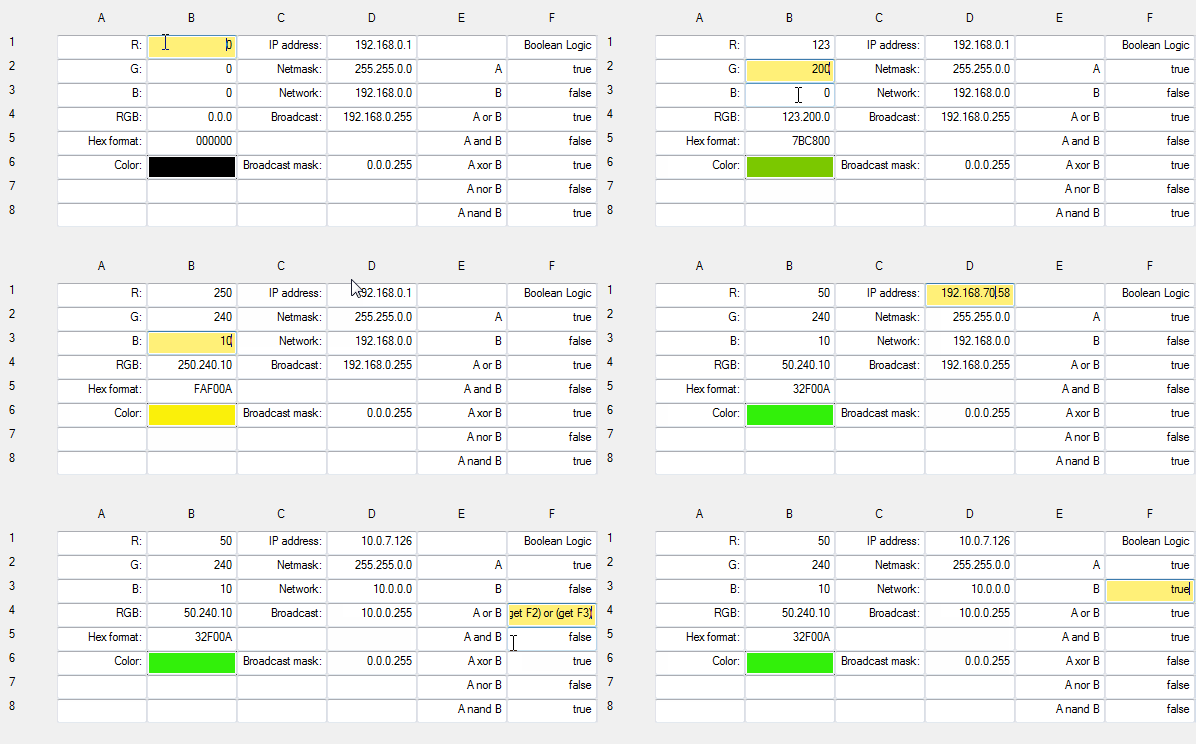
第二个范例展示怎么利用Red丰富的资料型态。
这也展示了你可以从单元格里存取、修改face物件的属性

如果你想用这个资料集,使用这个脚本

这些影片是在Windows上录的。目前Windows是我们最先进的GUI后端。OSX跟GTK后端还在开发中。

这个展示是承袭Tcl/tk那个用了30行的类似范例。
那个范例有利用内建的网格构件以及一个C风格的解析求值表达式的库叫expr。
即便如此,Tcl/tk能用这么少行还是不错的。
但真正的王者是这个220比特的JS程序。
虽然这与其说是展示JS的表达力
不如说是展示了DOM的厉害(后面有个100MB+的runtime)。
不管怎样,这个Red的范例是目前所知使用原生GUI的最小程序。包括可执行文件的大小也是最小的。
编译过后(头部加上Needs: View)只有655KB,
压缩过后剩下221KB,
并且如同之前说的,没有任何依赖。

以上源代码为了用最少行经过紧缩,但仍然可读。Red代码就算故意要混淆也是很难的。
Red代码记号之间必须要有空格,这就没办法做C那样偏激的事情。
要用Red赢一场每个字节都算分的代码高尔夫也很难……
除非你用Red的DSL功能写一个最少长度的DSL。
那也没问题,基本上就是个为Red/Rebol设计的压缩标准。 ;-)

怎么作到的?

这个程序利用了Red/View GUI引擎、响应式框架、Parse DSL和Red语言核心。
很多人可能第一次听说,Red语言核心是Rebol语言的衍生,有编程语言中最高的表达力之一。

想要搞懂上面代码的人可以看这个更可读的版本。
接下来是详解。其实这个程序比看起来的简单多了,开始吧:

第一行

1
L: charset "ABCDEFGHI" D: union N: charset "123456789" charset "0"

跳过Red的[]头部,这行定义几个bitsets,
会用来解析。我们合并N和”0”来生成
D charset,
这样可以省下空间

第二行

1
repeat y 9 [repeat x 9 [col: either x = 1 [#" "][#"A" + (x - 2)]

双重循环产生所有需要的小窗口构件,如果该列是个表头col设成一个空格
否則设成A到G之间的一个字母。等下用来生成单元格名称和第一行的标签。

第三行

1
append p: [] set ref: (to word! rejoin [col y - 1]) make face! [size: 90x24

这裡我们开始建构face。在p区块里面累积。p: []是一种静态分配,而且不用
换行很方便。set ref: (to word! rejoin [col y - 1])这部份很好懂,
是把make face!生成的face加到p列表中。这个表达式创建单元格的名称(一个
字母表示列然后一个数字表示行),这被转换成一个word然后引用新创建的face。
有这些词才能支持试算表公式引用。最后没关闭的区块接受一个嵌套表达式,
size定义是属性定义裡面最短的,所以可以加在这裡。

第四行

1
type: pick [text field] header?: (y = 1) or (x = 1)

第一行/列的face类型可以是text,否则可以是field。header?这个word之后还有用处,来检查一个单元格是否只是标签或是个域。如果你好奇为什么用or而不是更常见的any,这是因为那样的话pick会要求把结果转换成logic!,这会花很大的计算量。

第五行

1
offset: -20x10 + as-pair ((x - 1) * size/x + 2) ((y - 1) * size/y + 1)

face的位置由x与y的值计算,以形成一个网格。然后我主观觉得稍微往左偏移一点比较好看。

第六行

1
text: form case [y = 1 [col] x = 1 [y - 1] 'else [copy ""]]

face的内容设为col,col包含了列的标签或是行数,否则的话这是输入单元格,col是个空字串。

第七行

1
para: make para! [align: pick [center right] header?]

face 的para物件只是用来把标签置中同时保持普通单元格内容靠右对齐。

第八行

1
extra: object [name: form ref formula: old: none]

extra 域包含一个物件,这个物件内含单元格的状态:

  • name:单元格名称,字串格式比较适合公式编译器。
  • formula:引用最后一个输入的公式,文本格式。
  • old:引用最后一个单元格公式引起的反应(或是为空)

第九行

1
actors: context [on-create: on-unfocus: function [f e][f/color: none

单元格定义几乎结束了,只剩下事件处理,这行开始定义事件处理。单元格创建时会呼叫on-create,保证preset内容在显示前会正确处理(如果是公式的话)。on-unfocus主要负责处理用户的输入。on-enter没有用,因为现在tabbing支援不能正常工作。按Enter键会保持焦点在同个单元格上,要解决这种副作用需要好几行。一旦tabbing恢复正常我们可以加上这个。最后因为函数的主体区块是开放的,我们可以塞一个短表达式,把单元格背景色重设为默认值。

第10行

1
if rel: f/extra/old [react/unlink rel 'all]

我们开始处理有趣的部份。如果一个公式产生一个反应,我们先消灭那个反应。

第11行

1
if #"=" = first f/extra/formula: copy text: copy f/text [parse remove text

如果检查到一个公式,那我们把文本复制下来,之后用来解析成Red表达式。因为series被deep reactors所有(例如一个face!物件),copy会确保转换期间没有物件事件产生。第二次copy会生成另一个输入字符串实例让extra/formula引用。如果输入字串不是一个公式,之前这些工作都不会影响单元格的内容(只是会浪费空间,但我们这裡不在意这点)。最后,如果这是一个公式,我们去掉开头的等号然后用一个Parse规则转换它。

第12行

1
[any [p: L N not ["/" skip not N] insert p " " insert "/data "

这个规则一开始是个循环,目的是搜索所有单元格名称并且前面插一个空格再在后面加上”/data”(A1变成A1/data)。
not ["/" skip not N]这个规则避免转换到带face属性的单元格名称(例如A1/color)
,规则是检查斜杠后面的第二个字符是不是数字,所以除法A1/B2仍然可以转换。

第13行

1
| L skip | p: some D opt [dot some D] insert p " " insert " " | skip]]

如果输入不是一个单元格名称,搜寻数字(某个D),包括带小数(opt [dot some D]),这样我们可以插入空格(”1+2“变成”1 + 2“)来遵守Red的语法规则(因为我们之后会LOAD这个字串)。| L这部份是防止给带符号的数字插入空格(”-123“不会变)。最后一个skip规则会跳过其他不重要的字符。

第14行

1
f/text: rejoin [f/extra/name "/data: any [math/safe [" text {] "#UND"]}]

转换基本完成了。最后一步是给字串加上特殊字符好生成Red表达式。首先我们把刚才的结果包在一个math/safe [...]区块中。math函数的作用是保证数学符号的优先级,而/safe选项会在内部尝试求值,因此出错的表达式会回传none值(然后翻译成#UND字串)。求值的结果被设给当前单元格。所以当你在C1单元格输入像=A1+B1这样的公式,我们会得到以下转换的结果:
“C1/data: any [math/safe [ A1/data + B1/data ] "#UND"]“。这是可以LOAD的表达式字串。但是我们的代码裡没有LOAD?其实有,这归功于0.6.1版的新功能:一个域的/text属性默认与/data属性用一个LOAD呼叫同步。如果呼叫失败,/data被设为none。相反,设置/data也会把/text改成FROM呼叫的结果。这就是这个表达式的目的 ;-)

第15行

1
if f/data [any [react f/extra/old: f/data do f/data]]]]

现在我们来到了高潮部份。上一行设置了f/text产生字串LOAD过的版本,由f/data引用。如果LOAD失败了,f/data会被设为none然后我们就能退出事件处理。否则我们就有东西可以喂给REACT来给这个单元格产生一个响应关系。这就是之前给单元格名称加/data有用的地方。REACT会静态分析path!值来找出响应源。不过如果表达式裡没有响应源(例如”=1+2“这个公式会把f/data赋值成[C1/data: any [math/safe [ 1 + 2 ]]]),那么REACT回传none然后我们就可以直接对表达式求值,求值结果会赋值给当前单元格的/data(这也会改变/text,然后使用者就看得到了)。另一方面如果REACT成功了,我们就给这个单元格设了新的响应关系。响应关系默认在构造时会执行一次,这可以确保单元格显示正确的值(通过隐式地改变/data,大家一定都很熟悉了)。还有,我们把用来生成响应关系的表达式的一个引用存在extra/old,因为有新公式的时候要把旧的给删除。如果你到目前为止都看得懂,恭喜,你已经是View跟响应式框架的大师了 ;-)

第16行

1
on-focus: func [f e][f/text: any [f/extra/formula f/text] f/color: yello]

第二个事件处理器是当单元格得到焦点的时候会把公式写回来。同时我们把背景色设为yellow,也就是……恩,像yellow但是稍微没那么黄……所以我们把这个不常见的颜色命名成这样。(卡尔,你看到这裡的话,我希望你欣赏我给你那个有创意的命名格式打圆场的努力;-))

第17行

1
]]]] view make face! [type: 'window text: "PicoSheet" size: 840x250 pane: p]

最后一行只是生成一个窗口,并且把先前生成的标签和域赋给它的/pane属性(face的子元素)。然后显示窗口并view呼叫进入事件循环。大功告成!

追记

我们希望大家读过这个范例和解释觉得有意思也学到东西。你不是每天都会做一个试算表应用。这种应用很特殊,结合了很实用、强大的功能,同时只有基本电脑技能的人也能使用。
很多人把试算表应用视为我们工业软件世界的集大成。微软CEO自己几天前宣布说Excel是他
公司做过最好的产品。

Red让你可以很直接方便的用原生技术写一个这样的应用。我希望这可以让更多人有兴趣学习Red并用Red写更多给力的软件。

除了有趣以外,这个范例也展示了Red在原生GUI应用领域的潜力(我们现在只是0.6.1版,
我们还计画了很多功能和支持)。在原生和Web方案的大战之中,我们预料Red有朝一日会
是一个重要的选项。

在那之前……希望你喜欢Red,就像我们一样! ;-)

SVD Image Compression

Posted on 2016-05-03
1
2
3
from skimage import data, filter
import matplotlib.pyplot as plt
%matplotlib inline
1
2
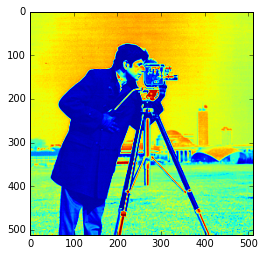
image = data.camera()
plt.imshow(image);

png

1
image.shape
(512, 512)
1
2
from scipy import linalg
import numpy as np
1
2
U, s, Vh = linalg.svd(image)
assert(x > x2 for x, x2 in zip(s, s[1:])) # the singular values are returned in descending order!

SVD can be used to compress image (“Introduction to Linear Algebra”, G. Strang, 4ed, p.365).

Before the image is 512×512 pixels.
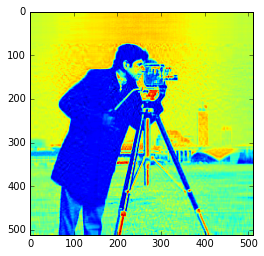
After the image can be stored as Rank×512×512 pixels

When Rank is something like 50 there is essentially no big difference from original image.

1
2
3
4
5
R = 50
Sigma = np.diag(s[:R])
compressed_image = U[:, :R] @ Sigma @ Vh[:R, :]
plt.imshow(compressed_image)

png

Replace DASH with Synapse

Posted on 2016-05-01

I found the launcher application called Synapse and it’s indeed very easy to use. It basically replaces Bookmarks and the built-in DASH launcher of Ubuntu. I set the keybinding to CTRL-TAB which seems to interfere the least with any applications.

Next is disabling the Launcher from its default keybinding of <Super>.
This page describes how to use Compiz Config Setting Manager (ccms) to disable/change Launcher activation key.

Finally, Synapse by default ships with the search engine DuckDuckGo, if you are like me who just uses Google you can try this solution on Launchpad.

[流水帳] Reinstalling 16.06

Posted on 2016-04-25

記一次系統重裝

Read more »

Python最最佳指南

Posted on 2016-03-31

Python 的「最最佳作法」(the Best of Best Practices)指南。(原文 by @Sloria)

概論

價值觀

  • 「不要做己所不欲的工具給人用」 - Kenneth Reitz
  • 「簡單永遠勝過多功能」 - Pieter Hintjens
  • 「滿足 90% 的使用情境,不要管奧客」 - Kenneth Reitz
  • 「優美勝過醜陋」 - PEP 20
  • 「為開源貢獻」(即便最終是為了閉源項目)
Read more »

How to set up CS224U sans Anaconda

Posted on 2016-03-30

Here is a way to run the CS224U notebooks without using Anaconda, especially if you already have python installed and don’t want to be bound to Anaconda.

Read more »

My first post

Posted on 2016-01-22

Test Markdown Features


Todos

Setting up the log is just the first step. I still need to

  • [x] deploy to the web
  • [ ] set up tool chain to write log using haroopad
  • [ ] add link to this log site

Planned contents

  1. upload my notes for various courses and tech-talks.
  2. keep track of paper reading progress
  3. notes on Machine Learning
nykh

nykh

8 posts
0 categories
6 tags
RSS
Main github
© 2017 nykh
Powered by Hexo
Theme - NexT.Mist